Showing posts with label Tied with a Ribbon Patterns. Show all posts

Wednesday, May 24, 2023

Quilt Goals with Fat Quarter Shop

As a Quilter one of the most exciting things you can hear from a friend is “Can you show me how to make a quilt?”  All the emotions start running as you know that the adventure ahead for your friend is going to be amazing and hopefully the start of their own loved and long quilting journey.

I have been invited by Fat Quarter Shop to participate in the Quilt Goals 2023 Challenge and my Goal was to help a friend with Quilting for the first time.  I thought that it might be helpful to share with you, my top 5 Tips for Teaching a friend to Quilt.


1. Keep is Simple

For someone starting out in quilting – choose a pattern that is simple in design but big on impact.  Repeated blocks work well as you can focus on teaching them the importance of a 1/4in seam allowance and how to sew one block – which they can then gain confidence in sewing by repeating and seeing their skills grow as they make the blocks.  They will love seeing their stack of blocks grow and it spurs their enjoyment of quilting.


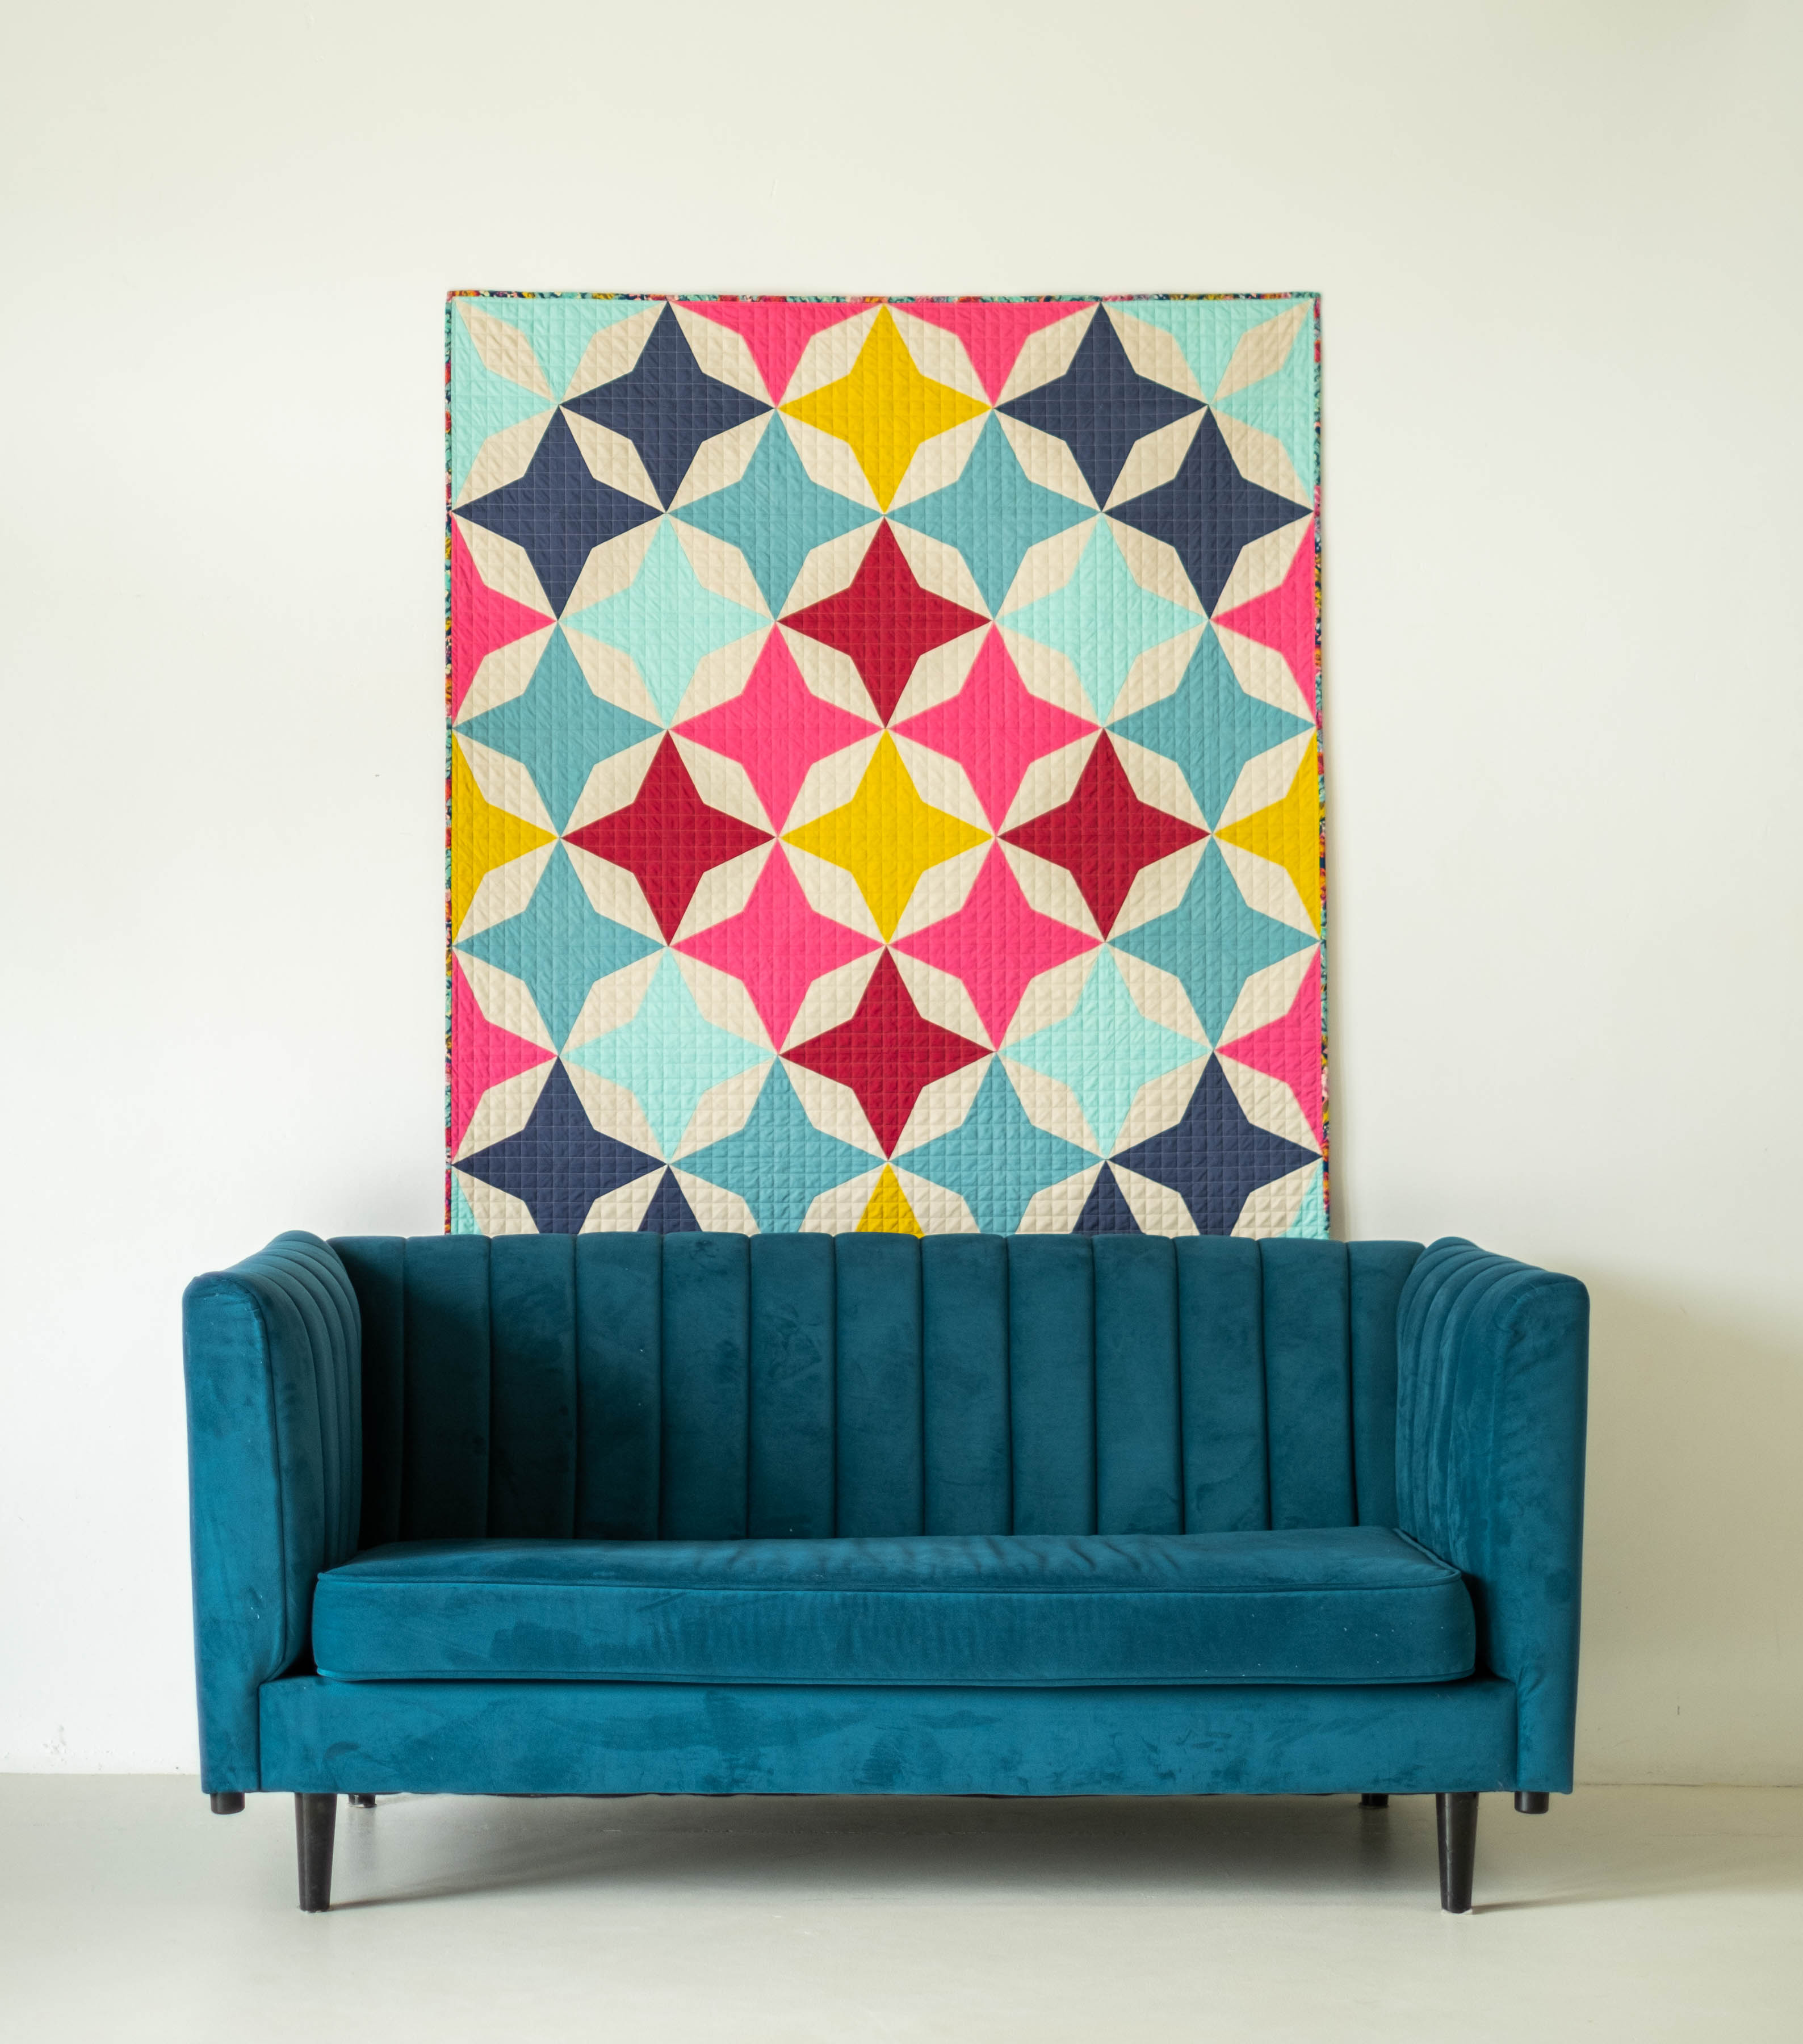
This design is my Liberty Belle Quilt and it uses a repeated block pattern to achieve this stunning quilt.  How amazing are the colours from Melody Millers Curio Collection for Ruby Star Society.


Get the Liberty Belle Quilt pattern here


2. Colour Confidence 

This takes time for quilters to develop and will grow and change over time.  Start out using collection. These already have colour combos worked out and work really well together. This means at this early stage for a new quilter they can work on their skills of sewing rather than being worried or unsure of what colours work well together or if it will turn out ok.  Fabric collections take out the guesswork.


3. Get the right Equipment 

Setting up the sewing machine with a 1/4in foot will be such a game changer.  Often when people are new to quilting, they take the machine straight out of the box or dust it off (a gift from a great Aunt) and start quilting and soon run into trouble when all the points and blocks don’t line up.  While this isn’t about perfection – it is about having the machine “Quilt ready” with the correct foot for quilting. 


4. Borders – make or break!

Not all quilts have borders but when they do this can be the make or break of how a quilt looks.  Make sure you correctly teach your friend to measure and then cut the Border strips to fit the quilt top measurements.  Just sewing border strips to the quilt top, then cutting off the excess can result in flared or buckled quilts once quilted.  By doing it this way you can be adding length to the quilt top and this is why the borders then flair out.  It is important to measure and cut each border strip to size.  You can watch here to see how to do this.


How to get Perfect Borders – 

https://www.instagram.com/p/CbxLmNXDZWD/  


5. Binding is fun!

I know it can often be that part that many quilters aren’t that over the moon about but I wanted to share a couple of my favourite ways to Bind so that you can easily love binding yourself and show your friend how it can be relaxing and that last final touch to a quilt. 


Continuous Corner Binding Tutorial – https://www.blog.tiedwitharibbon.com/2018/01/how-to-sew-your-quilt-binding.html


How to invisibly sew down your Binding - https://www.instagram.com/reel/CgwNv3ljYwF/


With these tips, you and your friend will absolutely love quilting up a storm together.


Liberty Belle Quilt Pattern


If you loved it to – make sure you keep up to date with all the Tied with a Ribbon News here - https://subscribepage.io/TWARnewsletter


Happy Quilting

Jemima x 

Friday, May 5, 2023

Amour Granny Square Bag Tutorial by Amy of Happy Hippie Studio

Hey there! I’m Amy from Happy Hippie Studio , and I am stoked to be bringing you a tutorial for the Amour Granny Square! This pattern combines my two favorite things: yarn and fabric. 


A little backstory: 

I started crocheting when I was eleven. My family lived in Montana where the winters were long and there wasn’t much to do other than drink coffee and crochet (let’s not talk about how I developed a caffeine addiction at eleven!) For many years, I only used fine thread and made so. many. doilies. As I got older, I wanted to make things that were utilitarian as well as beautiful, so I ventured into making blankets and bags. 

I didn’t start quilting until 2013 when my oldest was a baby and I was a stay-at-home-mom struggling with depression. Making simple quilts gave me the quick wins I needed to feel like a productive adult again. 

Now that the kids are a little older, I’m enjoying taking the time to dive deeply into both crochet AND quilting, and finding unique ways to combine them! Just don’t ask me to knit anything. It will likely take a really long time. 

This tote bag is a fun combination of crochet and machine sewing. Yes...you can absolutely use your sewing machine to sew through crocheted items! It’s not scary, I promise. 

Just grab your copy of the tutorial at the link here and get stitching! 

Are you nervous about sewing fabric to yarn? Don’t be! Here are a few tips to help it go super smoothly: 

1. SLOW DOWN! Put your machine at half speed or less. 

2. Pins are your friends! The heat from the iron won’t penetrate the thick yarn,   so use lots of pins. Seriously. If you think you have enough, use more anyway. 

3. Use a longer stitch than normal. Mine is set at 2.7 mm. 

4. Don’t change the tension. 

5. Use a thread that matches the background fabric on your bag. This will make seams disappear.

6. Use a 1⁄4” seam. I’m lazy, and don’t like taking off my quilting foot, so this pattern was written with 1⁄4” seams. If you’re a quilter, this will save you a step since you’re accustomed to using your 1⁄4” foot for, well, everything. 


The variation in thickness will hide a lot of flaws, and look really artisan. Perfection is so overrated anyway!
 

Grab your copy of the free tutorial and get started ASAP here! 

While my style tends toward the vibrant and scrappy, this tote would be GORGEOUS in a neutral palette (hello, earth tones!). If you make it in neutrals, please don’t forget to tag @happyhippiestudio and @tiedwitharibbon so we can feature your work on our accounts and use #amourgrannysquare and #tiedwitharibbonpatterns


Thanks for sewing along, Amy
Piece. Love. Quilt. 

Sunday, November 27, 2022

Choose your Own Adventure Quilt Pattern Release

Sometimes patterns take a while to come to life and be released out into the Quilty universe.  This is exactly the case for the Choose Your Own Adventure Quilt and I am so excited to introduce my latest release to you and I promise it has been worth the wait.


The Choose Your Own Adventure Quilt features 1 pattern that has 2 design colourways.  This means that you can make either the Inside Out version or the In Colour Order and be walked through exactly how to make either one.  No guess work, no reading between the lines and trying to figure it out yourself.  This pattern includes everything you will need to know to make either design.


For the In Colour Order version I made it using Speckled from Ruby Star Society inspired by the beautiful Floral Backing fabric by Melody Miller also of Ruby Star Society.


The Inside out version was made using Art Gallery Fabric Pure Solids and the beautiful floral again inspired the colour way which is called Boho Fusions by Art Gallery Fabrics.

This pattern is made by Foundation Paper Piecing (FPP) and no matter whether this is the first time you have tried this technique or you are a pro FPP'r then you will find that everything is explained.

The Choose your own Adventure Quilt is 56.5in x 70.5in (145cm x 180cm) and the pillow finished size is 20.5in x 20.5in (52cm x 52cm)

The bumper sized pattern includes:

Full colour step-by-step instructions

Cutting Guides

Pictures and diagrams

Full colour layout guides

Full size templates

Colouring pages and even

BONUS - pillow pattern so that you can accessorise with the scraps.


And because I like to make things as easy as possible - I have made a FPP Paper Pack that goes with this Quilt pattern so that you don't have to worry about printing off templates yourself - simply cut and sew.  All the printing is done for you so that you can make one complete quilt.  Check them out here in my store.

You can now get the Choose your Own Adventure Quilt pattern in both PDF and Printed Booklet formats in my store.  FPP Paper packs are available here.

For wholesale customers you can get the Choose your Own Adventure Quilt pattern and paper packs at Creative Abundance and Checker Distributors.

I have also had the most amazing pattern testers work on this new design - make sure you check out #chooseyourownadventurequilt on Instagram for some absolutely breath taking versions.

Happy Quilting

Jemima x x

Sunday, October 16, 2022

Quilt Symposium - Wellington, New Zealand, 2022

What an amazing 8 days away at Quilt Symposium in Wellington, New Zealand.  I was so thrilled to be invited to teach at this event and boy did I love being back in the classroom teaching and also all the amazing inspiration I took from the trip.

Quilt Symposium was held in Lower Hutt, Wellington and completely run by an outstanding Quilt Group.  Seriously this was an event that hosted 1000 students and 40 Tutors and then there was everything that went into the behind the scenes and it was truly a remarkable job.

TEACHING

Over 4 days I taught 4 different classes.  In these classes I met some remarkable women from all over NZ and even a large number from AUS.  I really loved being able to share and show with these quilters all about my patterns and help them through making their chosen design.  Here are just a few of the pics I took of some of my students work.


EXIBITIONS
Held also in conjunction with all the teaching classes were many Exhibitions of makers work in all sorts of categories and collections.  This was so inspiring to see some amazing artistry in the Quilts and I was left not only wanting to come home and have a big clear out of my studio and take a new look at my fabrics and way of putting quilts together but also just so amazed at the details and work in these quilts.

"Lockdown life" by Robyn Croft

"Stolen Moments" Kathy Doughty

"Going Going, Goin" by Debra De Lorenzo

TUTORS

Have you ever heard of the saying - "Work so hard the people you admire become your colleagues" - well this couldn't be more true.  I really enjoyed meeting and catching up with so many Australian and NZ teachers who all have such amazing talents of their own.  I learned a lot from these amazing and very inspiring teachers and women.


SIGHTSEEING
When I wasn't teaching I was making sure to get out and about and experience all that Wellington has to offer.  Such a beautiful city and just a few highlights below.


WOW - World of Wearable Arts Awards


The event is held only in Wellington and is a cross between an amazing Arts Costume Display and Cirque Du Soleil. It's only on for 2 weeks and happened to be on at the same time as I was there.  This show was truly amazing and I was able to nab myself a last minute ticket the night before in the back row.  And being in the back row, was no less thrilling.  This really was such a feast for the eyes and incredibly inspiring.  I encourage you to check out @wow for loads of pics and videos of the event.

I had the most amazing 8 days aways and can't wait to see more of the finished quilts from my students as they finish them over the coming weeks and months.

Happy Quilting
Jemima x 

Friday, October 14, 2022

Measure Once Mini Quilt pattern release

Little did I know that quite a number of years ago when I designed the "When Life gives your Scraps" mini Quilt that this would start the series of well loved Sewing quote Mini Quilts.  Today I am adding number 7 to the collection....

Introducing the Measure Once Mini Quilt.


This new fun to make, play on words Measure Once Mini Quilt is all about the pitfalls most of make at sometime in our sewing projects.  Now I know most people know the saying as "Measure Twice, Cut Once" but as I said this was a play on words and just as true!

This applique quilt features a pennant style shape that you can add to any sewing space, make for your friends or create for a Mini Quilt swap project.

There are options in this design as well to customise it to your preferences.  If you don't like the word - "cuss" you can use "cut", maybe you prefer scissors to make it for a garment making friend - well these are also included.  You can of course also place the wording in the more traditional order.  It's up to you.

I made this mini quilt using Tula Pink's Tiny Beasts collection.  It is a great scrap buster or for smaller pieces you have in your stash.  Applique it by hand or machine.


If you are new to Applique or would love some tips then you can head here to my blog post that has all my favourite and best Applique Tips and Tricks.


The second version I made with Tilda's latest collection - Hometown.  You can see in this version how I changed out the wording and the notions.  So fun to make this design your own.  


For wholesale customers you can purchase the Mini Quilt through Creative Abundance here.

I hope you enjoy making this mini quilt and adding it to your collection.

Happy Quilting
Jemima x x
Related Posts Plugin for WordPress, Blogger...